
Webflow: Drag & Drop Website Builder — Produce high quality HTML, CSS & JavaScript, without writing a single line of code
- Have an idea for a website, but struggling to get started?
- Don’t know enough HTML to code a website from scratch?
- Maybe you’d just prefer to avoid the costly subscription to services like Wix or Squarespace.
For these reasons, & many more, I recommend Webflow!
Here is a site that I created quickly & easily to demonstrate Webflow’s most useful functions without writing a single line of code.
No experience necessary!
- Resource: https://macdara-work.github.io/

Read on for instructions on how to create & export this site.
Background
When I first started making websites, I pitched my services to all of my family & friends.
I accepted every job that came my way!
Some of these jobs included working on websites already started or built with drag-and-drop, no-code services like Wix and Squarespace.
Some of the no-code sites I looked at were really simple – No bells & whistles at all – just a static page or two. But the page would have a monthly/yearly subscription fee!
Sometimes, I would encourage my “clients” (also known as my family/friends) to let me build the exact same site in vanilla HTML & CSS so that they could move it off of the subscription service, & host it elsewhere for much cheaper.
If they accepted my offer, I would get to practice my coding, & also feel good about providing some value.
Still a beginner, my hands would cramp up from all of the typing – There was so much repetition, & it felt tedious at times.
I longed for an easier way; to somehow speed up the process of producing clean code that was easy to read & edit, without relying on frameworks that would bloat the code with plugins & libraries, and whose output was often difficult to read.
Zero-Code Website Building
Enter Webflow!
💡 Webflow’s wiki describes it as “a SaaS application that allows designers to build responsive websites with browser-based visual editing software. While designers use the tool, Webflow automatically generates HTML, CSS, and JavaScript.”
Even if you have no experience working with HTML, CSS or JavaScript, (although a little bit certainly helps), anyone can quickly & easily create a great-looking website. The code can be exported & used elsewhere, with no further obligation to Webflow. You can cancel your subscription & still keep the code.
To demonstrate how this works, I’ve used Webflow to:
- create a page containing a simple photo gallery
- export the code
- host it online for free, using a GitHub account
Why not log onto Webflow & create an account? It’s free to try.
* Code export is restricted to paid subscriptions.
👉 Recommended: Using Webflow to create websites for clients is literally a great way to make money as a freelancer on Upwork with zero coding experience. Earn while you learn!
How to create a photo gallery in Webflow (Visual Step by Step)
(See all slides by clicking here)
1 – Create a new project

2 – Select Blank Site

3 – Select Div block from the Elements tab & drag it onto the canvas


4 – Select Text-Box from the Elements tab & drag it into the newly created Div block

5 – Type some text into the Text-Box

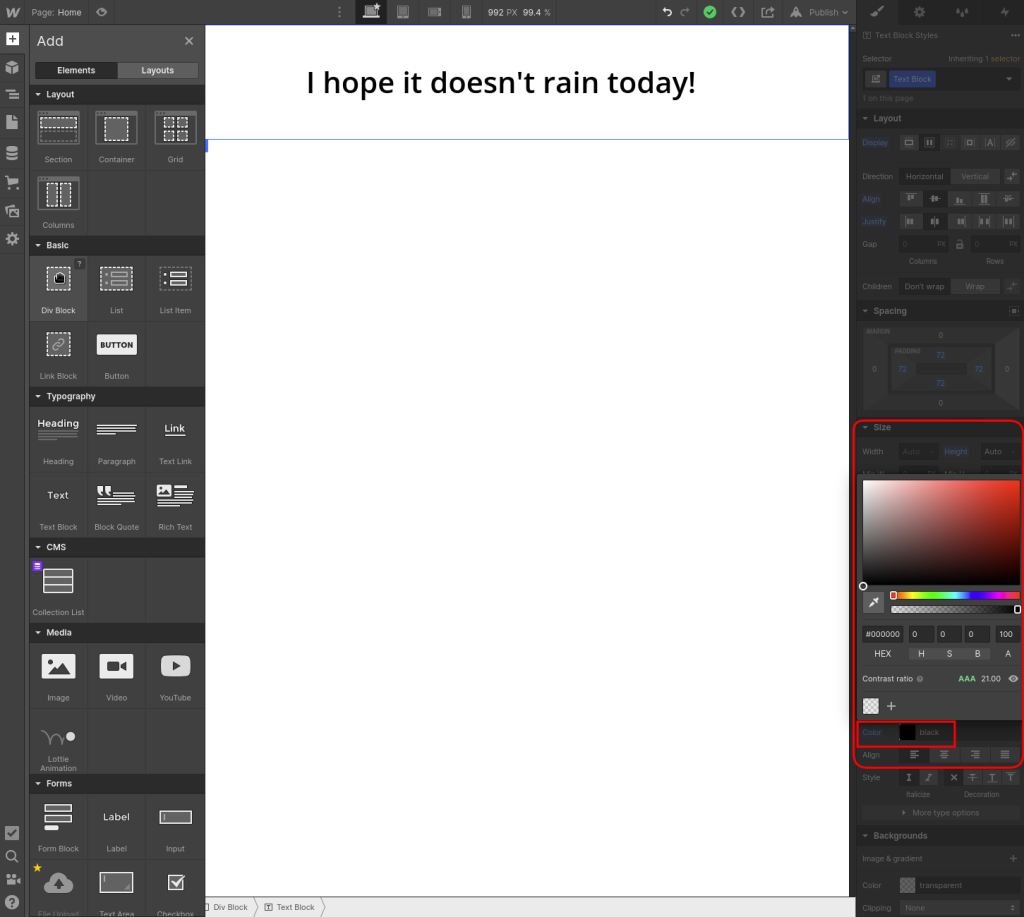
6 – Change Text-Box display settings to Flexbox, then set Align & Justify to Center

7 – Adjust Text-Box margins, increase font size & change font type

8 – Increase Font weight (Make text bolder)

9 – Change the text Color to Black
10 – Drag another Div into the canvas, and drop it under the existing content.
Then, select a Grid block from the Elements tab & drop it into the newly created Div

*See how the elements are organised in the Navigator panel

*A 2×2 grid will appear inside the Div

11 – Add a third column to the grid

12 – Select a Lightbox element from the Components panel & drop it into the first box in the grid


13 – With the Lightbox selected, configure Display as Flexbox, aligned & justified to Center.


14 – Repeat steps 12 & 13 for every box in the grid.

15 – Grab some images to use in the gallery!

16 – Upload/Drag & Drop the images to the Assets tab

17 – Thumbnail – open the Image element settings, then select “Choose Image”, & pick an image from the assets tab.

18 – Repeat step 17 for all lightboxes.

- At any point, click on the “eye” symbol in the top-left corner of the Webflow interface to see how the site is coming along.

19 – For each lightbox, open Image Settings/Lightbox Settings, & select the same image that was chosen as its thumbnail.

20 – Tick the “Link with other lightboxes” box, & input the same group name for all lightboxes. (This will enable them all to be scrolled as a single collection)

How’s everything looking so far?
Now is a good time to give that “Eye” a click!!
* At this stage, I realised that the grid looked better with 2 columns instead of 3, so I removed a column in the settings.

*I also realised that the grid content looked a bit messy at larger screen sizes.

*I decided to put the Div that contained the grid element inside of ANOTHER element called a container!!! (Containers have a set default width, which was useful in this case.)
21 – Drop a Container element onto the canvas (underneath the grid), then drag the div containing the Grid element inside of it.

*You can see that the gallery looks neater after the grid has been moved inside of the container.

Quality-Control:
I renamed the div containing the text to “heading”, & the text-box inside of it to “header”
I renamed the div containing the grid to “photo-gallery”
I scrolled through the Breakpoints options to see how the page would appear on smaller screens.

The text in the header appeared too large in the Mobile Portrait view, so I reduced its font size.

Still in the Mobile Portrait breakpoint, I reduced the grid from 2 columns to 1 column.

Happy with the results, I clicked on the “Export” icon

As the last step in Webflow, I downloaded a zip file containing all of the HTML, CSS, Javascript & images that made up the website

*The total size of the page was less than 1 megabyte!
HTML, CSS, Javascript & Image Files
The final task was to follow this guide from Github Pages, which describes how to create a new Github account, upload the exported code, & host the site for free.
https://pages.github.com/
I hope this information will be helpful to someone out there!
Thanks for reading 🙂